
Chad Westport
Indoor Cultivation Specialist
Table of contents
Growing up, we were always told to eat healthy so that we could grow up strong and full of energy. Would you believe that your cannabis plants need to eat well too? As kids, we were told to drink our milk because the calcium would build strong bones. Would you believe that calcium helps your cannabis plants grow stronger cell walls?
Another nutritional tip that we were always given is that we needed to have a balanced diet. As adults, we know that we shouldn’t over-consume Vitamin C, even though Vitamin C is good for us. Similarly, plants shouldn’t be given excessive nitrogen, even though nitrogen is good for the plants. Today, we’re going to give you an overview of cannabis nutrition and how you can reap bountiful harvests. If you like big buds, keep on reading.
Understanding Nutrients and Cannabis Basics

Cannabis nutrients are the equivalent of a healthy diet. A healthy diet is going to give your body the fuel it needs to sustain energy levels during exercise and daily tasks. During the daylight hours, cannabis plants produce and store energy through photosynthesis to grow bigger and stronger. This daily function requires specific fuel. Cannabis nutrients can provide this custom-tailored diet.
Balance is the key to proper cannabis nutrition, but not every nutrient is needed at the same level. There are “macronutrients” that are needed in higher levels in the cannabis plant, and there are “micronutrients” that are needed in smaller percentages. We’ve prepared an entire article about macro and micro nutrients for you. Still, regardless of whether you're growing in coco, soil, or hydroponics, the rules of proper nutrition apply to all.
The main macronutrients are nitrogen (N), phosphorus (P), and potassium (K). Printed on most nutrient bottles, boxes, or bags, you will see three numbers on the front that reflect the N, P, and K values. When growing cannabis, the ratio of macronutrients will vary depending on what stage of growth your plant is at. The different N/P/K requirements are why you will often see vegetative and flowering formulas sold separately.
Our Bestsellers

How and When to Feed Cannabis
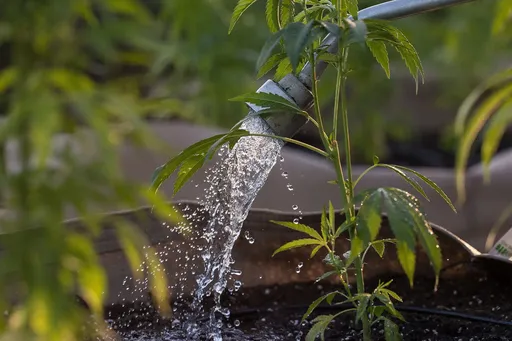
Most often, nutrients are added to water and then applied to the media. Media type and a variety of other factors will influence when to feed your cannabis plants. Luckily, we’ve got some pretty great guides. One of the first decisions in planning your grow will be which medium you are going to use. I always encourage new growers to start with either coco or soil.
Both soil and coco provide a buffer around the root system, unlike hydroponics, where the nutrients have direct and immediate access to the roots. Hydroponics can offer explosive growth, but there is less margin of error when it comes to getting the nutrient levels correct.
Growers will feed each of the mediums slightly differently, so it is good for you to know the differences between them before getting started in the garden.
The largest determining factors of how much to feed and how often to feed your cannabis plants will be the size of the container, the root zone, and the canopy. I feed my plants every 2–3 waterings in soil, and with almost every watering in coco. How often really depends on pot size, plant size, and how fast things dry out.
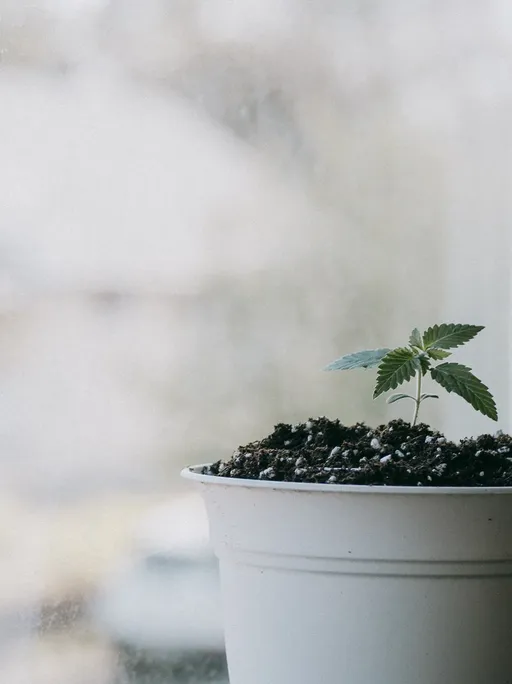
Seedlings don’t require many nutrients. Often, soil mixes have enough nutrients already in them to support seedling growth.
As your seedling grows and the root system expands during the vegetative stage, a larger container size and/or more frequent watering and feedings may be needed. It is good to let the roots stretch out, avoid using small containers (1-gallon or less) for too long after the seedling stage. A 1000ml measuring cup is an excellent tool to keep your watering volume consistent.
 A 1000ml measuring cup is your best friend for easy and consistent watering
The more vegetation a plant has, the more transpiration (plant sweating) occurs. This means the plant is using more water from the root zone. Small plants will need less water, less frequently. Bigger plants, like the ones in the flowering stage, will need more water, on a more regular basis.
A quick reference for when to water is the weight test. A fully saturated container is heavy. When it reaches half of the saturated weight, it is likely time to water again.
How to Read a Nutrient Feeding Chart/Schedule?
Good news! Nutrient companies have spent a bunch of money finding the right fertilizer formulations for your plants. Having done so, most cannabis nutrient companies have published easy-to-use feed charts on their websites or packaging.
The most important thing when looking at online nutrient charts is that the chart is specific to your medium. Feeding schedules for hydroponics will be different from soil or coco. Be sure to look at the correct feed chart for your chosen media.
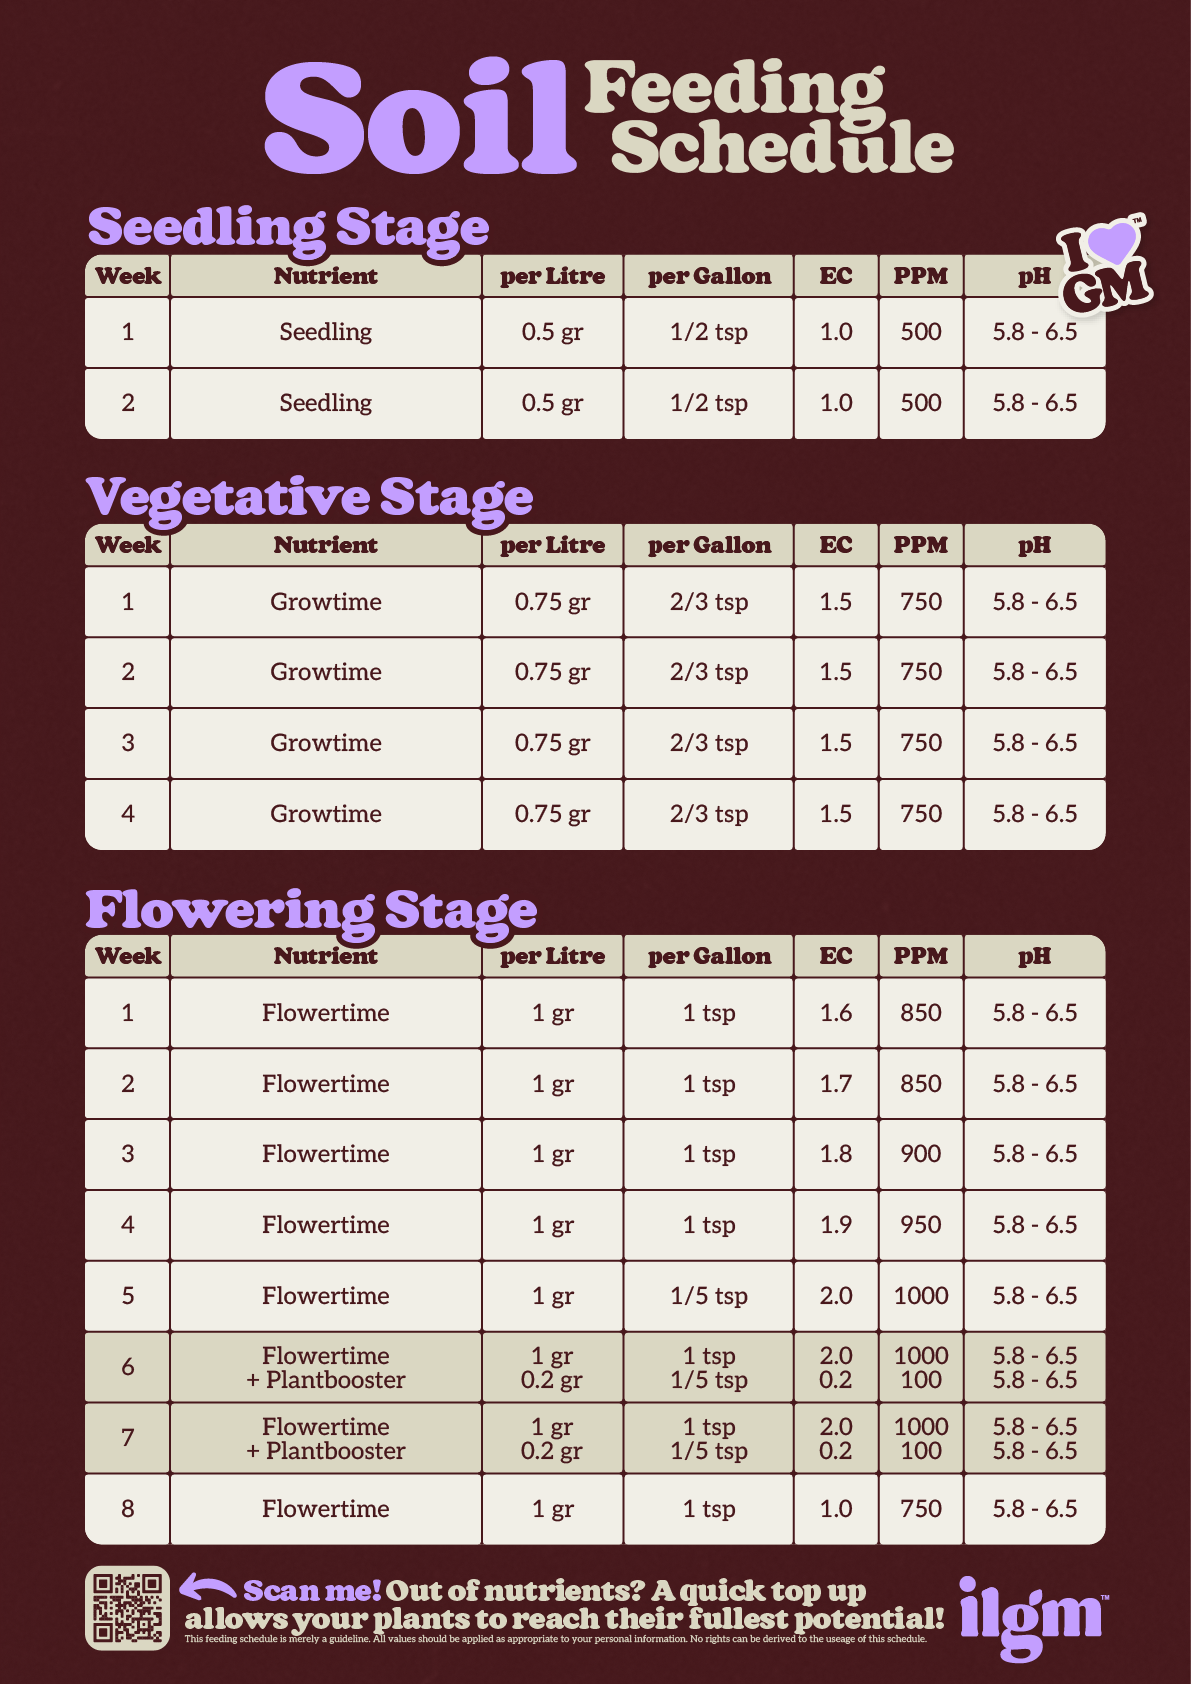
Most feed charts will give growers the exact amount of nutrients to add to their water in any specific week of the growth cycle. Growers will notice that the level of nutrients starts low, increases until late-flower, and then decreases until harvest.
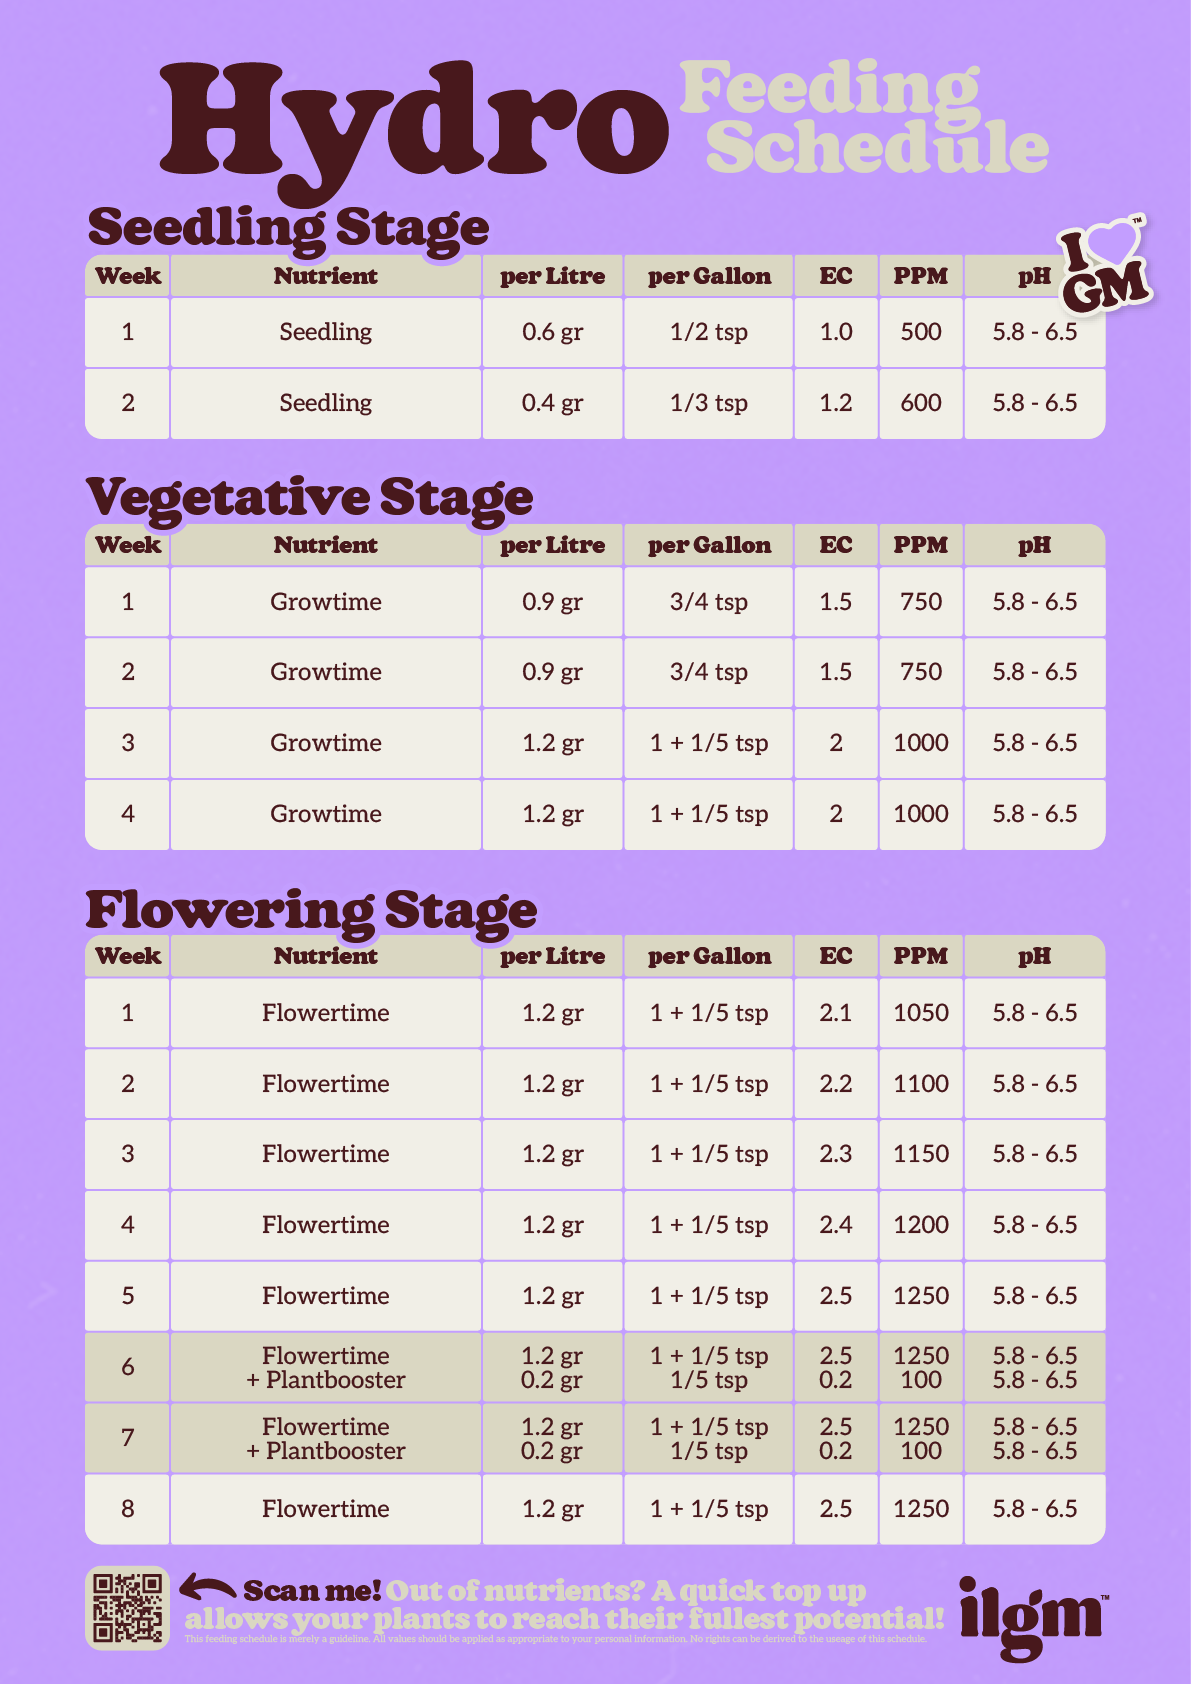
The amounts of nutrients to add are often measured in milliliters (ml), and the given amount is usually based on 1 gallon of water. It is suggested to follow the feeding recommendations to get the best results, although some growers will use half-strength and still see good results. Find your sweet spot.
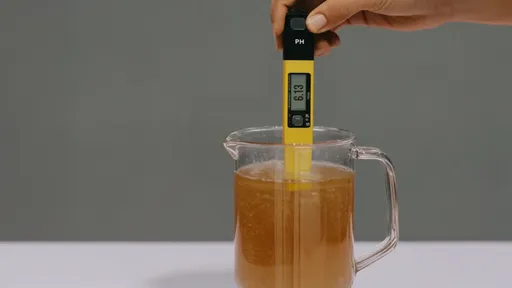
Monitoring Water Temperature, pH, and EC

Knowing these three things, temperature, pH, and EC, is like having a cheat code for proper plant nutrition. Water contains dissolved oxygen, which the root system loves. Low water temps have more dissolved oxygen, but too cold can shock your roots. Higher water temps have lower dissolved oxygen levels and can also lead to root problems. A water temperature of 65-68 degrees is the sweet spot for cannabis.
Cannabis plants have a desired pH range, and monitoring this variable will greatly increase your yields. If the pH of the water or root zone is out of the desired range, although nutrients are there, the plant won’t be able to access them. Different nutrients will have differing effects on raising or lowering the pH of water. Always check your pH after the nutrients have been mixed.
There are a few mathematical formulas for measuring the nutrient load of a liquid. In cannabis, PPM (parts per million) and EC (electrical conductivity) are commonly used. EC is the unit preferred by professionals. High EC or PPM means that there are a lot of nutrients in solution. Low EC or PPM indicates minor amounts of nutrients in solution. Use this variable to control the level of nutrients your plants receive.
Identifying and Solving Nutrient Issues: Deficiencies and Nute Lockout
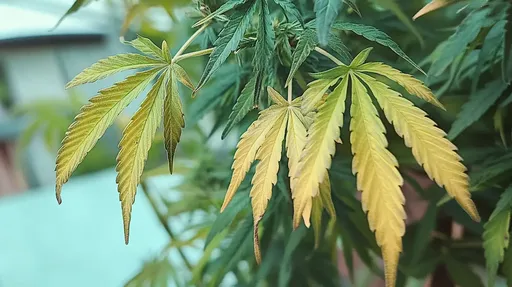
Visual observation is the best tool a homegrower has for detecting nutrient issues. When there is trouble, we will often see a change in the color of the leaves. First, you should look at the location of the discolored leaf - is it at the top, or is it at the bottom? Location can narrow down the possibilities by determining if it’s a mobile or immobile nutrient at play.
When the big, old leaves on the bottom of the plant turn yellow, it is usually because the plant is sending nitrogen to the new growth to support its appetite, which indicates a lack of nitrogen in the soil. Nitrogen is a mobile nutrient. It can be sent from the lower portions upward to support new growth.
If the tops of your plant are turning a pale yellow, but the bottom is still lush and green, perhaps it is a lack of sulfur in the media. Sulfur is immobile in the plant, meaning that even if the lower leaves have plenty, they are unable to send the resource upwards to support the demand from the new growth.
The difference between a deficiency and a nutrient lockout is that in the case of a nutrient lockout, plenty of the desired nutrient is in the media, but the plant can’t access it. This could be caused by pH, an imbalance of nutrients, or antagonistic effects between nutrients, which is illustrated by Mulders Chart. To help avoid these negative interactions, always mix your bottled nutrients in the order provided by the manufacturer.

A quick fix, no matter if a deficiency or lockout causes the problem, is the application of a foliar spray. Nutrients can be absorbed directly by the leaf tissue, but you wouldn’t want to apply foliar sprays during the flowering cycle. Foliar sprays allow you to give plants the necessary nutrients while you correct the deficiency or imbalance in the media. They are a band-aid, not the solution.
First Grow?
Organic vs Chemical Fertilizers
As hobby growers, we have the freedom to decide how we feed our plants. Both organic and chemical fertilizers have their advantages, but they are used differently, and growers should be aware of the differences. Medicinal growers often want cannabis free of pesticides, fungicides, and other chemicals. To them, organic may be the best approach. Other growers are simply looking for high yield, which chemical nutrients can easily achieve.
The largest difference between the two options is the availability of the nutrients. Chemical/synthetic fertilizers are fast-acting. They are in a molecular form that the plant roots can immediately uptake. Organic fertilizers are slow-release because they rely on soil biology to convert the organic nutrients into a form that is plant-available.
You can see results within a day or two after using synthetic nutrients, but organic nutrients can take up to two weeks to become available to the plant. Organic growers need to be able to anticipate the feeding needs of a plant and apply the fertilizers a few weeks ahead. Experience, along with trial and error, are the best ways to dial in a strain with organic feeding.
Enhancing Soil with Amendments

Organic growers use soil amendments in a variety of ways. Organic soil amendments that contain macro and micro nutrients, like worm castings, bone meal, and guano, are often slow-releasing. They often come in a powdered form and can be added directly to the soil. During a grow, dry amendments are added to the top of the soil, scratched in, and then given some water to help it penetrate into the root zone.
Other amendments are meant to support the diversity of biological life in the soil. Soil microbes are what take the organic minerals and convert them into plant-available nutrients. The more microbe activity you have, the faster this process of conversion goes. Growers often refer to this type of nutrient-rich soil as “living soil”.
Because synthetic nutrients are already available to the roots, microbial life isn’t necessary with that style of feeding.
Compost tea is a popular amendment that organic growers can use to support microbial life in the root zone. Mycorrhizae are also a common amendment. Mycorrhizae are fungi that form a relationship with the root zone, allowing it to absorb water and nutrients more efficiently.
Flushing Your Plants

Flushing your plants is the act of running large volumes of water through the root zone repeatedly as you approach harvest. Growers have done this in an effort to reduce the amount of chemicals remaining in the soil, thus triggering the plant to expend its stored reserves in the plant tissue.
There are recent studies showing how effective (or not) this practice is at removing mobile and immobile nutrients from the soil and plant tissue. However, it is still a common practice for synthetic growers to do.
As part of the growing process, synthetic growers will commonly flush the media a few times during the grow cycle to remove excess sodium that has accumulated through regular feeding.
Organic growers avoid flushing because that would also flush the microbial colonies that you have worked to build in the soil. Many organic growers reuse their soil, flushing the soil would be counterproductive.
Step-by-Step: How To Prepare Your Cannabis Nutrients
I have two sizes of watering cans, a 2-gallon and a 2-liter. The smaller, 2-liter can is used to water the plants, but the larger can is used to store water while it adjusts to room temperature and the chlorine off-gases.
These instructions are for coco and soil growers using bottled nutrients, whether they be synthetic or organic.
Tools used:
Watering can(s)
pH pen for checking water temperature and pH
Measuring cups (1000ml and 100ml)
Pipette or dropper (5-10ml)
EC / PPM pen to measure nutrient load in your solution
*Bonus item: Airstone to keep the nutrients mixing while in the larger can
How To Feed Your Cannabis Plant in 10 Steps:
1. Fill your large watering can and let the water sit for 24 hours (ideally)
2. Before adding nutrients, check the water temperature to ensure it is in an ideal range. (Add your airstone to the large can now.)
3. Refer to the feed chart from your nutrient company of choice.
4. Add the nutrients in the order listed by the manufacturer to ensure nutrients don’t fall out of solution.
5. Stir your final solution
6. Check the pH, adjust if needed (remember, coco and soil prefer slightly different pH ranges)
7. Measure your solution and add that to the small can for watering
8. Add solution to your potting container evenly, pausing to let water on the surface drain into the media
9. If there is runoff in the drip tray, remove any standing water
10. Discard any unused nutrients; don’t let them sit for more than a few hours, particularly if not using an airstone

Chad Westport
Chad Westport, a lifelong grower, breeder & cannabis educator, specializes in controlled environment ag with a degree in sustainability.


Continue Reading
You might also find these interesting.